
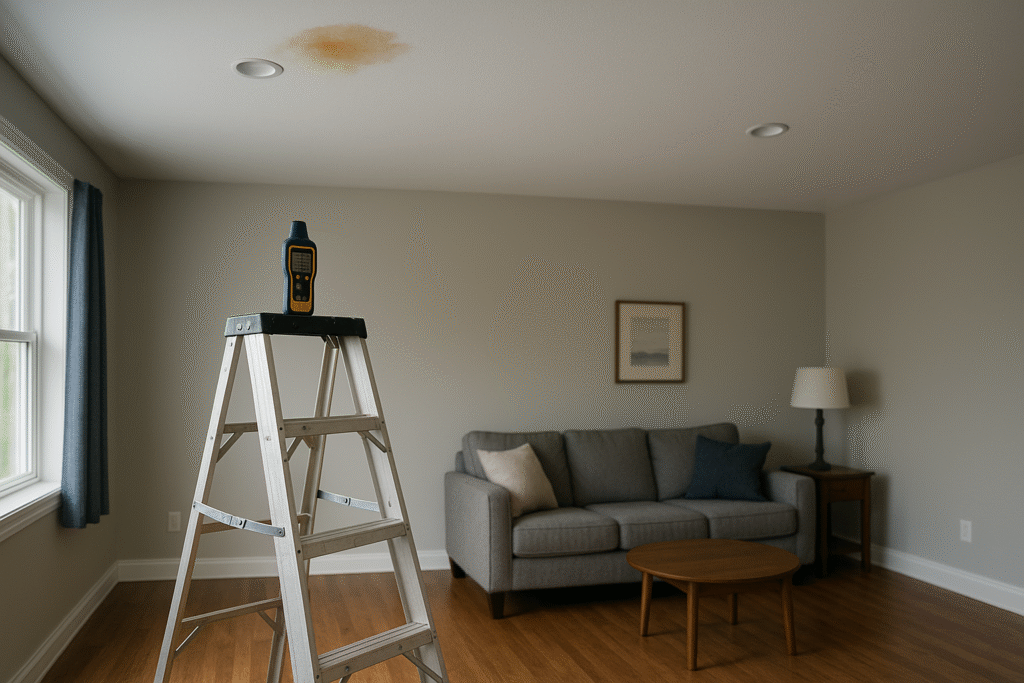
You notice a pale yellow ring blooming around a recessed light in your living room. It is small, dry to the touch and easy to ignore. A quick search for “DIY ceiling leak mold” brings up videos that promise a fast fix with stain blocker, paint and a fan.
The problem is that the stain is the last, not the first, chapter in the story of that leak. Above the drywall there may be soaked insulation, damp framing and early mold growth that is already spreading sideways. What looks like a minor cosmetic issue can quietly turn into a health problem, an insurance fight or a landlord dispute if you handle it the wrong way.
How A Small Ceiling Leak Turns Into A Hidden Problem
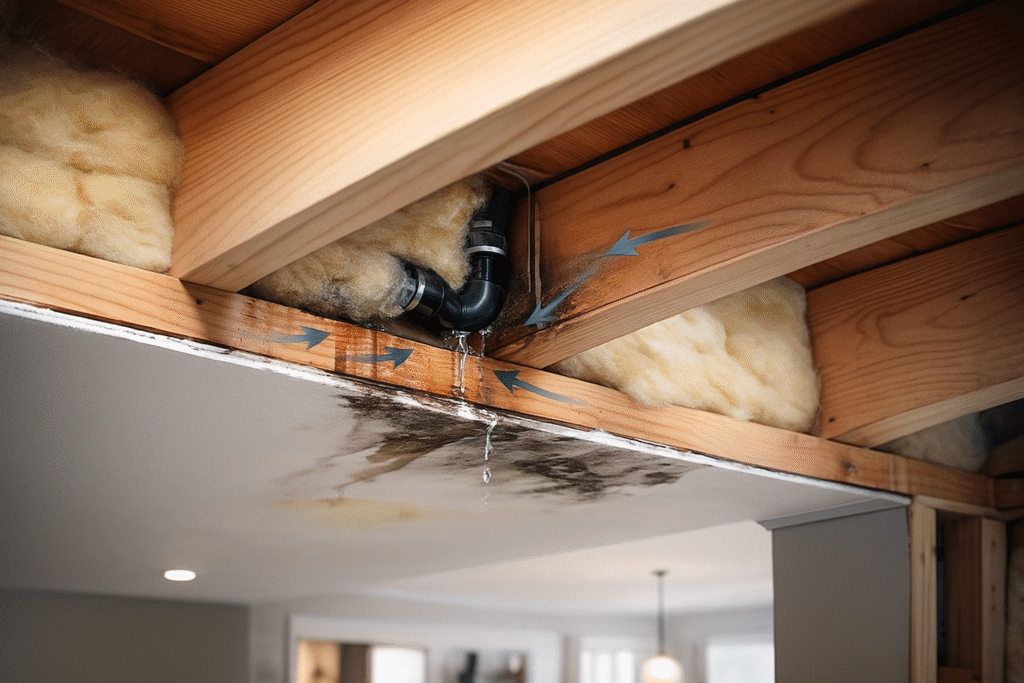
Most homeowners treat a ceiling leak as a spot problem. You look straight up at the stain and assume the wet area above is about the same size. In reality, the water often started several feet away and traveled through framing, insulation and wiring before it ever found a place to drip.
Why Water From A Ceiling Leak Spreads Sideways
Above a typical living room, your ceiling drywall is screwed to wood joists that run in one direction. A roof leak, a loose plumbing fitting or an overflowing bathtub upstairs rarely drip straight down. Water follows the path of least resistance, which means it runs along the top of the drywall, rides down the sides of joists and even wicks along electrical cables before gravity finally forces it through a nail hole or taped joint.
By the time you see a three inch stain, there may be several square feet of damp drywall and insulation above that spot. The insulation behaves like a sponge. It can hold water and slowly release it back into the air for days, even after the visible drip stops. That hidden moisture drives mold growth on the back of the drywall and on the wood framing, long before you smell anything musty.
In older homes near Lake Minnetonka, leaks from ice dams or worn plumbing can also migrate along framing into interior ceilings that are nowhere near the exterior wall. When you only patch and paint the visible stain, you are guessing where the water went instead of actually mapping it. That guesswork is where many DIY jobs go wrong.
The 48 Hour Clock For Wet Drywall And Insulation
Once moisture gets into gypsum board and fiberglass batts, time starts working against you. Mold spores are already present in indoor air. If the materials stay wet for more than a day or two, those spores have a perfect place to grow. Public health guidance notes that mold can grow wherever there is moisture around leaks in roofs and pipes and that cleanup, even after a small leak, can pose health and injury risks if you do not protect yourself properly, as described in the CDC mold clean up guidelines.
That does not mean you must panic every time a child splashes water out of the tub. It does mean that when a ceiling leak has soaked hidden cavities, you should think in terms of hours, not weeks. Either those materials need to be dried aggressively and completely, or they need to be cut out and discarded. Waiting a month to see if the stain “comes back” is essentially giving mold a head start.
DIY Ceiling Leak Mold Myths That Put Your Family At Risk
Search results and social media are full of quick fixes for ceiling stains. Many of them focus on cosmetics, not building science. As a result, homeowners are encouraged to cover up the symptom of a problem instead of dealing with the wet cavity, the air movement and the underlying source of the leak.
Myth 1: Painting Over Stains Solves The Problem
Stain blocking primer is useful, but it is not magic. When you roll primer and paint over a ceiling stain without confirming that the cavity above is dry and clean, you lock in whatever is happening behind the surface. If the back of the drywall is still damp or lightly moldy, the growth continues out of sight while the room looks fresh for a while.
There is also a documentation issue. If you ever file an insurance claim or need a contractor to justify repairs to a ceiling that has already been painted several times, it is much harder to prove when damage occurred. Fresh paint can make an adjuster suspicious that the current stain is “old damage” you tried to hide. In rental situations, painting over an active leak can also complicate your discussions with a landlord, because it blurs who knew what and when.
Myth 2: Box Fans And Dehumidifiers Can Fix Any Leak
Portable fans and dehumidifiers are helpful tools, but they are not a complete drying system. A fan that blows across the room and stirs the air under the ceiling does very little for the wet materials inside the cavity. Worse, if that cavity already has mold growth, open air movement can push spores out into the rest of the house instead of drawing them toward a controlled exhaust point.
Professionals place low profile air movers so that air washes directly across exposed wet surfaces, and they monitor humidity and material moisture readings. They also control where the air goes. When a DIY setup simply aims a fan at a closed ceiling, the top paper layer may dry while the core of the drywall and the insulation above stay damp. That “crust dry, core wet” situation is perfect for mold. It leaves you thinking the leak is resolved while the hidden risk keeps growing.
What Standards Say About Water And Mold Cleanup
Over the past two decades, government agencies and professional organizations have published detailed guidance about what to do with wet building materials. You do not need to memorize the technical standards to make smart decisions, but it helps to understand how they divide work between reasonable DIY cleanup and situations where a trained team is expected.
Size Thresholds And When DIY Cleanup Is Reasonable
Federal guidance often uses size as one of the key dividing lines. The U.S. Environmental Protection Agency notes that when the moldy area is smaller than about ten square feet, many homeowners can handle cleanup themselves if they fix the moisture problem, scrub hard surfaces with detergent and water, and dry everything quickly. Larger or more complex problems, especially after significant water damage, usually call for a contractor who follows established remediation guidelines, as outlined in the EPA mold cleanup in your home guide.
The challenge with ceiling leaks is that the visible stain rarely matches the real size of the wet area. A hand sized ring on the ceiling can easily sit under several square feet of damp insulation. When you base your DIY decision on the color you see instead of the moisture you map, you may be treating a “small job” as a weekend project when it actually behaves like a much larger loss behind the scenes.
Why Porous Ceiling Materials Are Different From Tile Or Metal
Guidance documents also draw a line between hard, cleanable surfaces and porous materials. Mold can usually be removed from metal, tile and other non porous finishes with thorough cleaning and drying. Ceiling drywall and acoustic tiles are different. Once they have been soaked, mold can grow inside the paper and in the tiny spaces within the material, which makes complete cleanup difficult.
For that reason, many standards recommend removing and discarding wet, moldy ceiling tiles and drywall instead of trying to “save” them with surface cleaners. In practice, this often means cutting away a larger section than the visible stain so you can reach clean, dry material and fully expose the cavity for drying. When homeowners are reluctant to open the ceiling that far, they sometimes leave a ring of slightly damp material behind the patch and create a perfect place for mold to return.
Where DIY Stops: Fire Smoke And Sewage Contaminated Leaks
Not all ceiling leaks are created equal. A slow drip from a supply line that you catch quickly is very different from water that carries soot from a fire damaged attic or sewage from an upstairs bathroom backup. Once contamination enters the picture, the discussion shifts from simple moisture control to biohazards and chemical residues.
Toxins In Fire Smoke And Soot On Wet Ceilings
After a fire in an attic or nearby unit, smoke particles and soot can settle on every surface, including insulation and the tops of ceiling drywall. When firefighting water or sprinkler water runs through that soot, it can wash fine particles, tars and combustion byproducts into the ceiling cavity. Those residues can be irritating or harmful when disturbed, and they also cling to materials, which makes odors very persistent.
Scrubbing or cutting into a smoke affected ceiling without proper containment and filtration can push fine particles into the air you breathe. Fire and smoke damage cleanup often involves HEPA vacuuming, removal of porous materials and controlled negative pressure so contaminants do not spread. That is a very different workflow from a simple “dry and repaint” job. It is a strong hint that this kind of ceiling leak belongs in the hands of a team that handles fire and smoke damage cleanup every week.
Health And Regulatory Issues With Sewage And Biohazard Leaks
Sewage backups, leaking waste lines and leaks contaminated with blood or other body fluids are even more serious. Water that looks clear by the time it reaches your ceiling may still carry bacteria, viruses and other pathogens from what happened on the floor above. Cleaning that kind of contamination from overhead cavities means working in close contact with materials that may be unsafe without full body protection and proper disinfectants.
When employers send workers into environments with biological hazards, they are expected to follow occupational safety rules that cover protective gear, exposure control and how contaminated debris is handled. Homeowners cleaning their own houses are not bound by the same workplace regulations, but the underlying health risks do not change. If the source of a ceiling leak involves sewage, medical waste or trauma, it is wise to treat it like a biohazard job and call a company that offers dedicated biohazard cleanup services instead of trying to tackle it alone.
When To Call A Pro In Chanhassen
In the southwest suburbs around Lake Minnetonka, many homes share similar construction details. Two story layouts with finished lower levels, recessed lighting and multiple rooflines leave plenty of places for water to hide. Knowing when to stop experimenting with DIY and bring in a local specialist can save you money, stress and conflict with insurers or landlords.
Red Flags That Your Ceiling Leak Is Not A DIY Project
Certain patterns tell you that a ceiling leak is bigger than a weekend patch job. Repeated staining in the same spot, a musty smell that lingers even when the ceiling looks dry and any visible mold spots on the surface suggest that the cavity above has been wet more than once. Sagging, bulging or soft drywall, especially over a large area, signals that the material may be weakened and unsafe to work under without controlled removal.
The source of the water matters too. Leaks tied to roof failures, long running plumbing drips, sewage backups or fire sprinklers are rarely simple. If the combined wet area you can document is more than a few square feet, or if there are vulnerable people in the home such as infants, older adults or anyone with asthma, it is sensible to bring in help. Minnesota public health resources also point out that tenants and landlords share responsibilities for fixing moisture problems and that the priority should be finding and correcting the source of moisture, not just testing for mold, as outlined in the Minnesota public health moisture and mold guidance.
If you rent an apartment or townhome, cutting into the ceiling without permission can damage building components you do not own and may violate your lease. In those situations, your first step should be written notice to the landlord or association, plus photos and dates, rather than a DIY demolition.
How A Local Restoration Contractor Investigates A Ceiling Leak
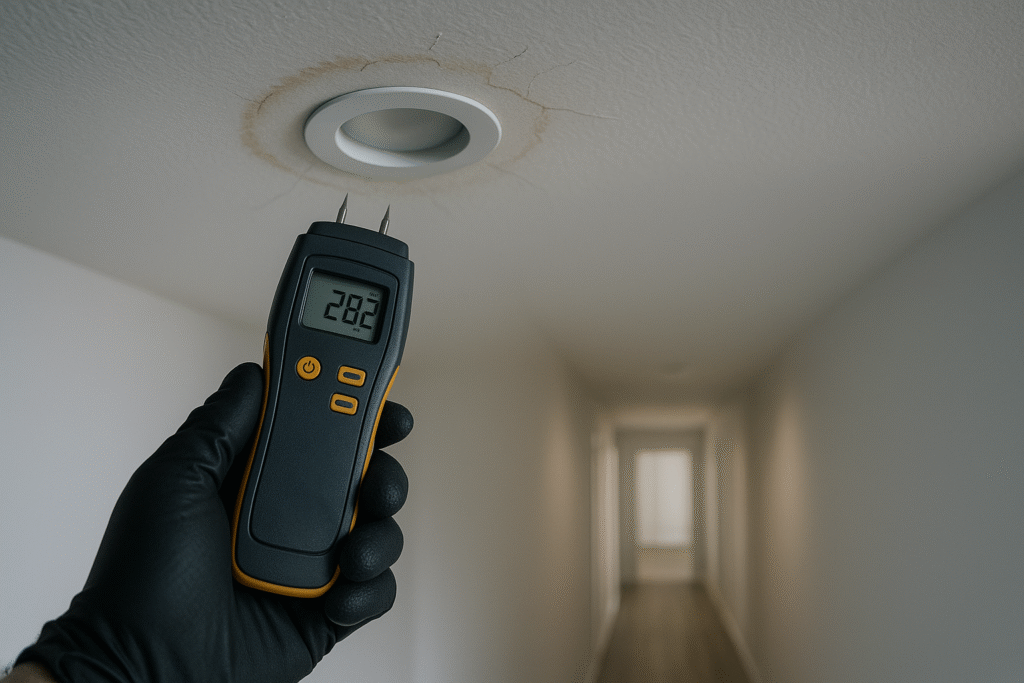
When a reputable restoration contractor visits a home in Excelsior or Minnetonka for a ceiling leak, the first task is detective work. They will ask when you first noticed the stain, what was happening in the rooms above and whether there have been past leaks. Then they map the wet area with a moisture meter, check adjacent ceilings and walls, and may use small inspection holes or infrared imaging to see how far the moisture traveled.
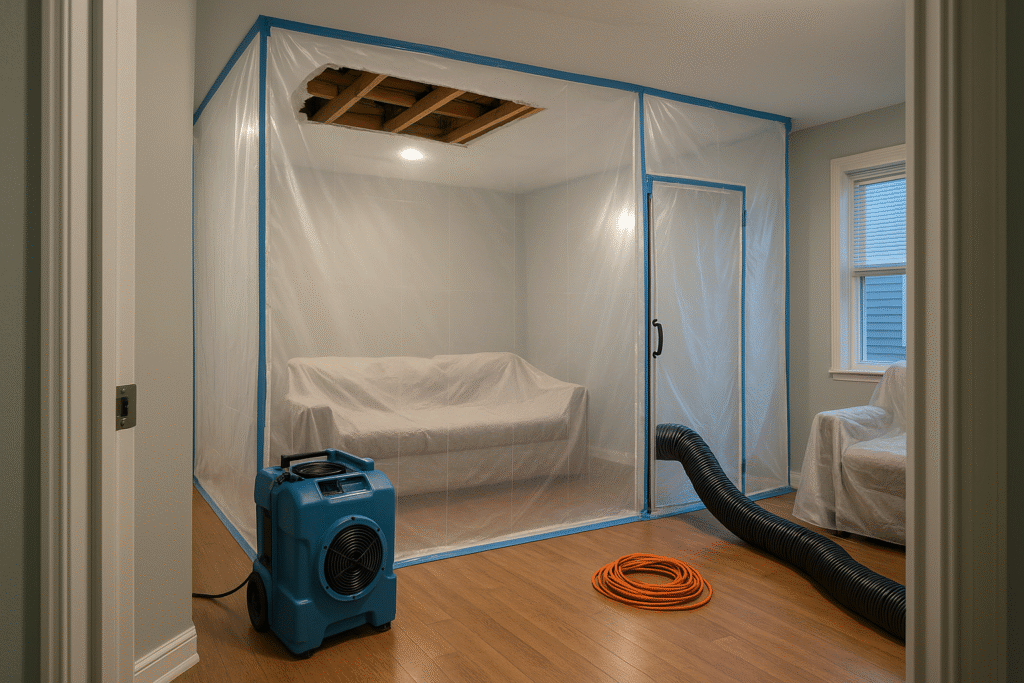
If mold or category 3 contamination is suspected, a company like Optimized Restoration will usually recommend containment before any major opening. That might include taping down floor protection, putting up plastic barriers and setting a HEPA filtered air scrubber on negative pressure so dust and spores are pulled into a filter instead of drifting through the house. Along the way they document conditions with photos and moisture logs that you can share with your insurance adjuster. Even if you plan to do some of the cosmetic repairs yourself, bringing in a contractor for the initial assessment and drying plan can keep your claim, your health and your building on safer footing.
[IMAGE 4: horizontal 16:9 medium shot from just inside a doorway at eye level, showing a living room work zone where a section of ceiling has been cut out above, with floor to ceiling 6 mil plastic containment walls taped to the ceiling and floor, a clear zipper door on one side, and a blue HEPA negative air machine with flexible ducting running out through a window; the remaining room shows covered furniture and neatly rolled extension cords on a medium tone wood floor with light gray painted walls and a white drywall ceiling; the visible damage inside the containment appears moderate with exposed joists and removed drywall edges, lit by even overhead work lights in the evening with a neutral cool documentary color grade, depth of field keeps the containment, equipment and cut out area in crisp focus while the far side of the room falls into a mild blur, and the style is photo realistic, documentary style, natural color, no visible logos, no text or on screen captions.]
Practical Checklist Before You Cut Into A Wet Ceiling
Before you grab a utility knife and a paint roller, it helps to walk through a simple checklist. This keeps your family safer and reduces the chance that a quick fix today becomes a costly correction project next season.
Step 1: Make the area safe. Move furniture and electronics out from under the stain, put down plastic or old sheets and watch for bulging or soft spots that could give way. If a bubble of water forms, carefully relieve it into a bucket so the weight does not cause a sudden collapse, and keep children and pets out of the room.
Step 2: Stop or control the source. Shut off water to any suspect plumbing fixtures, place catch pans or towels under active drips and, if you can do so safely, cover obvious roof entry points with a temporary tarp until a roofer can respond. Addressing the source quickly matters more than cosmetic work in the room below.
Step 3: Document everything. Take clear photos of the stain, any dripping, the room above and any wet materials you can safely see. Note dates and times. This record helps with insurance claims and gives a restoration company or plumber a clearer picture of what happened, even if things look drier by the time they arrive.
Step 4: Map the moisture, not just the stain. If you own a simple moisture meter, mark out damp areas on the ceiling and nearby walls with painter’s tape. If not, look for soft spots and subtle discoloration beyond the obvious ring. This step helps you understand whether you are dealing with a small, contained area or a larger problem that should skip DIY.
Step 5: Control air movement. Turn off central HVAC that blows across the affected ceiling so you do not push moist or moldy air into other rooms. Use localized ventilation instead, such as a fan blowing out a nearby window, to reduce humidity without stirring up dust throughout the home.
Step 6: Be honest about contamination and health risks. Ask yourself what kind of water was involved, how long the materials have been wet and whether anyone in the home has asthma, severe allergies or a weakened immune system. If the answer to any of those questions raises concern, treat that as a signal to call a professional instead of moving forward alone.
Step 7: Decide what you will and will not DIY. Many homeowners can safely handle small, clean water leaks that are caught quickly, especially when the affected area is limited and easy to access. Once the wet area is larger, the ceiling is sagging, mold is visible or contamination is suspected, your checklist should end with a phone call to a qualified water damage cleanup company rather than a trip to the paint aisle.
FAQ: Ceiling Leaks, Mold And DIY Cleanup
Homeowners across the Minneapolis suburbs ask similar questions when they see that first brown ring overhead. These answers provide a starting point so you can decide whether to tackle limited tasks yourself or bring in a restoration team.
Can I Clean A Small Ceiling Leak And Mold Patch Myself?
For truly small, clean water leaks, some homeowners can handle limited DIY work. If the leak was brief, the total moldy area is clearly under a few square feet and you can open the ceiling to dry and clean all the affected material, a cautious homeowner with good protective gear may manage the cleanup. You still need to fix the source of the leak, remove any moldy porous materials that cannot be fully cleaned and monitor moisture to be sure everything is dry. At the first sign that the damage is more extensive than you thought, or that the space above the ceiling is complex and hard to reach, treat that project as one that should be handed off to a professional.
Is It Legal To Do My Own Mold Cleanup In Minnesota?
In Minnesota, homeowners are generally allowed to investigate and clean mold in their own homes without special licensing, especially for small problems linked to everyday leaks. That said, rental housing and shared wall situations bring extra responsibilities. Landlords are expected to address moisture problems that affect habitability, and tenants are expected to report issues promptly rather than quietly painting over them. When mold problems are large, involve sensitive people or include possible code issues, it is wise to involve the landlord, association or a qualified contractor, and to talk with a lawyer or local housing resource if you have questions about your specific rights and duties.
Should I Cut Out Wet Ceiling Drywall Right Away?
Cutting out wet drywall can be helpful, but it should be done deliberately, not as a reflex. If the area is actively leaking, your first priorities are to control the source, prevent collapse and protect your belongings. Once things are stable, opening the ceiling in a controlled way can speed drying and make it easier to see the true extent of damage. To do that safely, you should think about where dust and debris will fall, what might be above the cut such as wires or pipes and whether any mold or contamination may be released. When you are unsure about those factors, or when the wet area is large or complex, pausing to get a professional assessment is usually safer than rushing in with a saw.
Understanding how water moves, how quickly mold can take hold and where public health guidance draws the line between light DIY cleaning and more complex remediation gives you real control over your decisions. You can reserve your energy for small, clearly defined jobs and use professional help for the ceiling leaks that come with bigger risks.
If you want a second opinion before you open a ceiling, a local restoration company such as Optimized Restoration can document moisture levels, outline options and handle the work if it turns out to be more than a patch and paint project. Even when you plan to do some repairs yourself, having a team on standby that understands insurance documentation, safe containment and drying science can keep your home, health and budget moving in the right direction.
Recommended articles
Kitchen Leak Mold Traps That Make Minnetonka Beach Families Overpay
A slow kitchen leak can quietly grow mold, trigger real mold health risks, and open the door for exaggerated bids and confusing insurance advice. This guide shows you how to protect your family’s lungs and your wallet with a clear kitchen mold action plan and scam-proof checklist.
Inside The Mold Remediation Process After A Kitchen Leak: St Louis Park Homeowner Guide
A slow kitchen leak can turn into a hidden mold problem in just a few days. This step by step guide walks you through what a professional mold remediation process looks like in a wet kitchen, how to spot bad contractors, and when to call a local pro for help.
How Eden Prairie Homeowners Can Avoid A $10,000 Mold Problem In The First 24 Hours After Water
A Friday night sump pump failure leaves a finished basement soaked and a family worried about both money and health. This case study walks through the first 24 to 72 hours after water damage, how fast mold and costs can climb, and what smart steps protect your home, kids, and pets.